Community resources
Community resources
How to create tooltips in Confluence Cloud
Want to give users extra information in a space-saving way? With a tooltip, you can keep context on-hand but hidden away until a reader needs a little support or extra context.
📝 Note: You can’t create tooltips with out-of-the-box Confluence, so our guide covers how to add tooltips with the help of an add-on, plus two alternative workarounds using Confluence’s native features.
⚒️ Option 1: A workaround using Confluence’s built-in features
Unfortunately, you can’t create tooltips without a third-party macro (scroll down to learn how 👇). However, one workaround is using icons that link to a footnotes-style list of definitions on the page.
Here’s how to use the workaround:
1. In Edit mode, scroll down to the bottom of the page and add a list of definitions. We’ve chosen to number ours.
2. At the beginning of each definition, type /anchor and click the Anchor link macro. Add a relevant link name in the sidebar.
3. Now go to where you want to add your first ‘tooltip’. Add an emoji or icon of choice, and format it to superscript.
4. Highlight the emoji/icon and click the Link icon in the toolbar, then add # followed by your anchor link name (e.g. ‘#API’).
5. Repeat steps 3-5 for your remaining definitions, then click Update or Publish on your page.
Benefits:
-
Uses Confluence’s built-in features, with no add-ons needed
Drawbacks:
-
It isn’t space-saving like a tooltip - it adds more text to your page.
-
It scrolls users away from their original reading position, which could be confusing and frustrating.
-
It isn’t the most professional-looking option available.
💡 Option 2: Atlassian Intelligence definitions
While not exactly a tooltip, if your organisation is on a Premium or Enterprise plan and has Atlassian Intelligence (AI) enabled, it’s possible for users to get a definition for any word on a Confluence page.
To get a definition, all you have to do is highlight a word and click Define in the pop-up. Some terms, such as acronyms, may already be underlined (so all you need to do is click).
If a definition isn’t quite right, you can click to edit the definition (and even choose the sources it pulls the information from).
Benefits:
-
It gives users access to instant definitions at any time, with no need for you to add specific tooltips.
-
Some terms (especially acronyms) are usefully underlined, meaning users know to click if they need extra assistance.
Drawbacks:
-
The feature currently isn’t available on Confluence live docs.
-
Not all terms are underlined, meaning definitions might be a little too hidden for many users.
-
Definitions rely on AI, which may not be ideal if your company needs maximum data security.
-
It may require extra monitoring to ensure all AI-generated definitions are correct (especially for terms or acronyms specific to your company).
⚡️ Option 3: Tooltips using a third-party macro
For a traditional tooltip effect that’s space-saving but still easy to spot, you’ll need the help of a third-party app. This guide uses the Tooltip macro included in Mosaic: Content Formatting Macros & Templates.

Benefits:
-
They provide at-a-glance information for users that need extra support.
-
When not hovered over or clicked on, tooltip text is hidden, keeping your page neat and tidy.
-
Information is served to users in the right context, with no redirecting or scrolling down the page.
-
You decide what is added to the tooltip, meaning you have total control over the content shown.
-
The Tooltip macro can be used on Confluence pages and live docs.
Here’s how to add a tooltip:
-
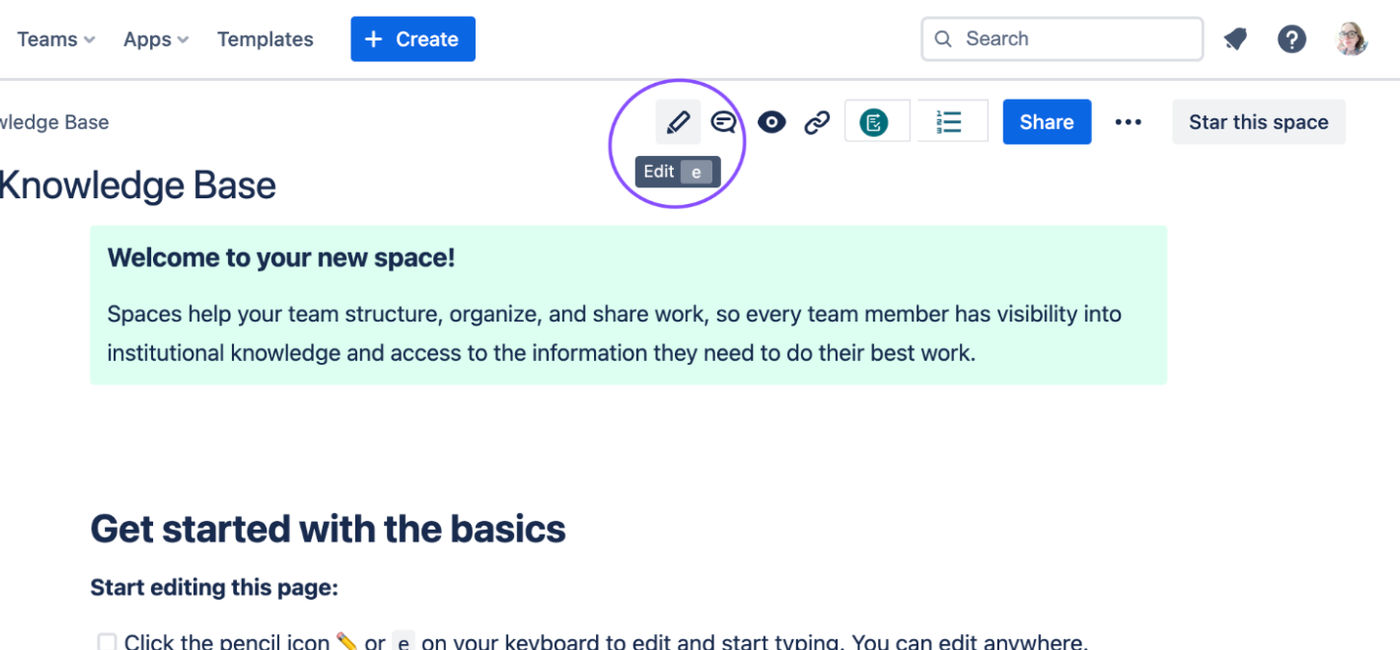
Click the pencil icon or press E on your keyboard to enter edit mode.

-
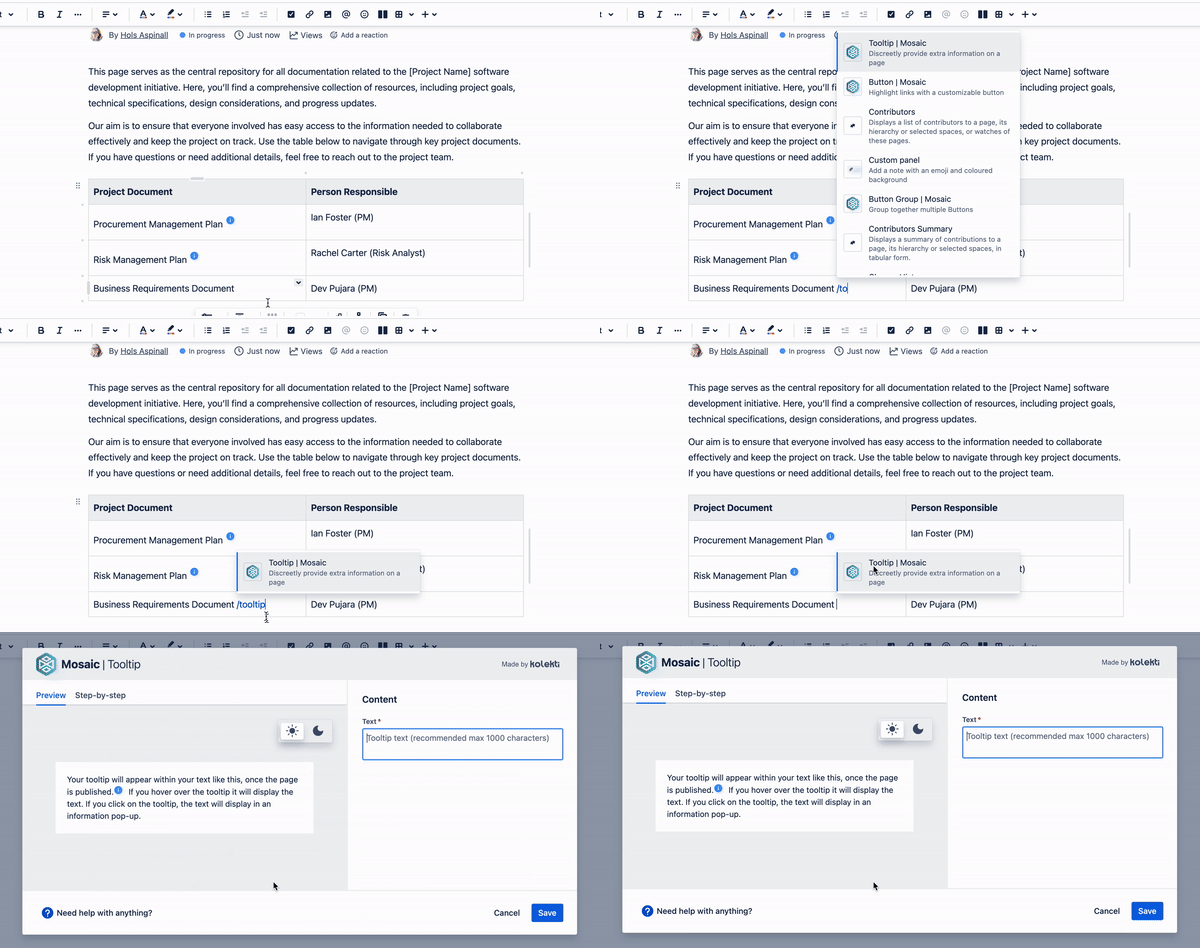
Click next to the text you want to provide more information on (e.g. an acronym/abbreviation). Type the /tooltip shortcut and select the Tooltip macro.

-
Add the text that will appear when a user hovers over (or clicks on) the tooltip. Then click Save.

-
When you’re done adding tooltips, click Publish or Update in the top-right of your page. You can then hover over your tooltip to see the extra information displayed.

What are your favourite ways to provide extra context for your users? Let us know in the comments! 👇
Was this helpful?
Thanks!
Zoriana Bogutska_Kolekti-Adaptavist_
About this author
Product Marketing Manager
Adaptavist
5 accepted answers


0 comments